memories ...

memories ...
Posts tonen met het label Summer. Alle posts tonen

vrijdag 12 juni 2015

Strawberry tart

Strawberry time is a beautiful time. We normally just eat the strawberries like they are or on top of some ice cream. But today I wanted to use them for a fruit tart. 

It's a recipe that can be used for just any kind of fruit topping. But when the strawberries are abundant there's no better way to decorate the tart than with the bright red berries.


My dad is usually the one making these kinds of tarts here at home. He uses puff pastry in his but as I am not a big fan of puff pastry, I decided to go on a different route and used a shortbread crust. Crunchy, sweet and nicely shaped to hold the vanilla cream and the fruit.
For the filling, I used pastry cream. You can also use plain vanilla pudding (freshly made), and that will make it less heavy on the stomach (as it will not contain the eggs). The pastry cream is just a touch more luxurious and therefore our way to go. To decorate you can use strawberry jam to get that shiny layer on top but this is not obligatory in any way. You can also put on some whipped cream or use some powdered sugar to sprinkle on top of the tart. 

Ingredients for the crust:
- 85 grams sugar
- 155 grams plain flour

- 1 egg yolk
- 115 grams butter
- 1/4 teaspoon salt
- (optional) vanilla extract
Ingredients for the pastry cream:
- 1/2 l milk
- 2 eggs
- 50 grams of instant vanilla pudding powder
- 4 tablespoons of sugar
Ingredients to decorate:
- 200-250 grams fresh strawberries
- (optional) 3-4 tablespoons strawberry jam

How to:
First make the crust. Mix the dry ingredients and then add all the other ingredients. By hand or with an electric mixer, combine everything until the dough comes together in a big ball. Put the dough in a mall bowl and put away in the fridge for at least 30 minutes.
Preheat the oven to 190°C.
Butter and flour a tart pan (I used a silicone one of about 28 cm in diameter so I didn't need to grease it at all - easy!).
Take the dough out of the fridge and roll out. Put the dough in the pan and press well so that all the sides are evenly covered. I pressed the extra dough in with the rest but you can also make a few cookies with it.
Put it in the oven for about 30-45 minutes but check regularly. When the dough is golden brown and feels firm to the touch, it's ready. When ready, take out of the oven and let cool.


In the meanwhile, make the pastry cream:
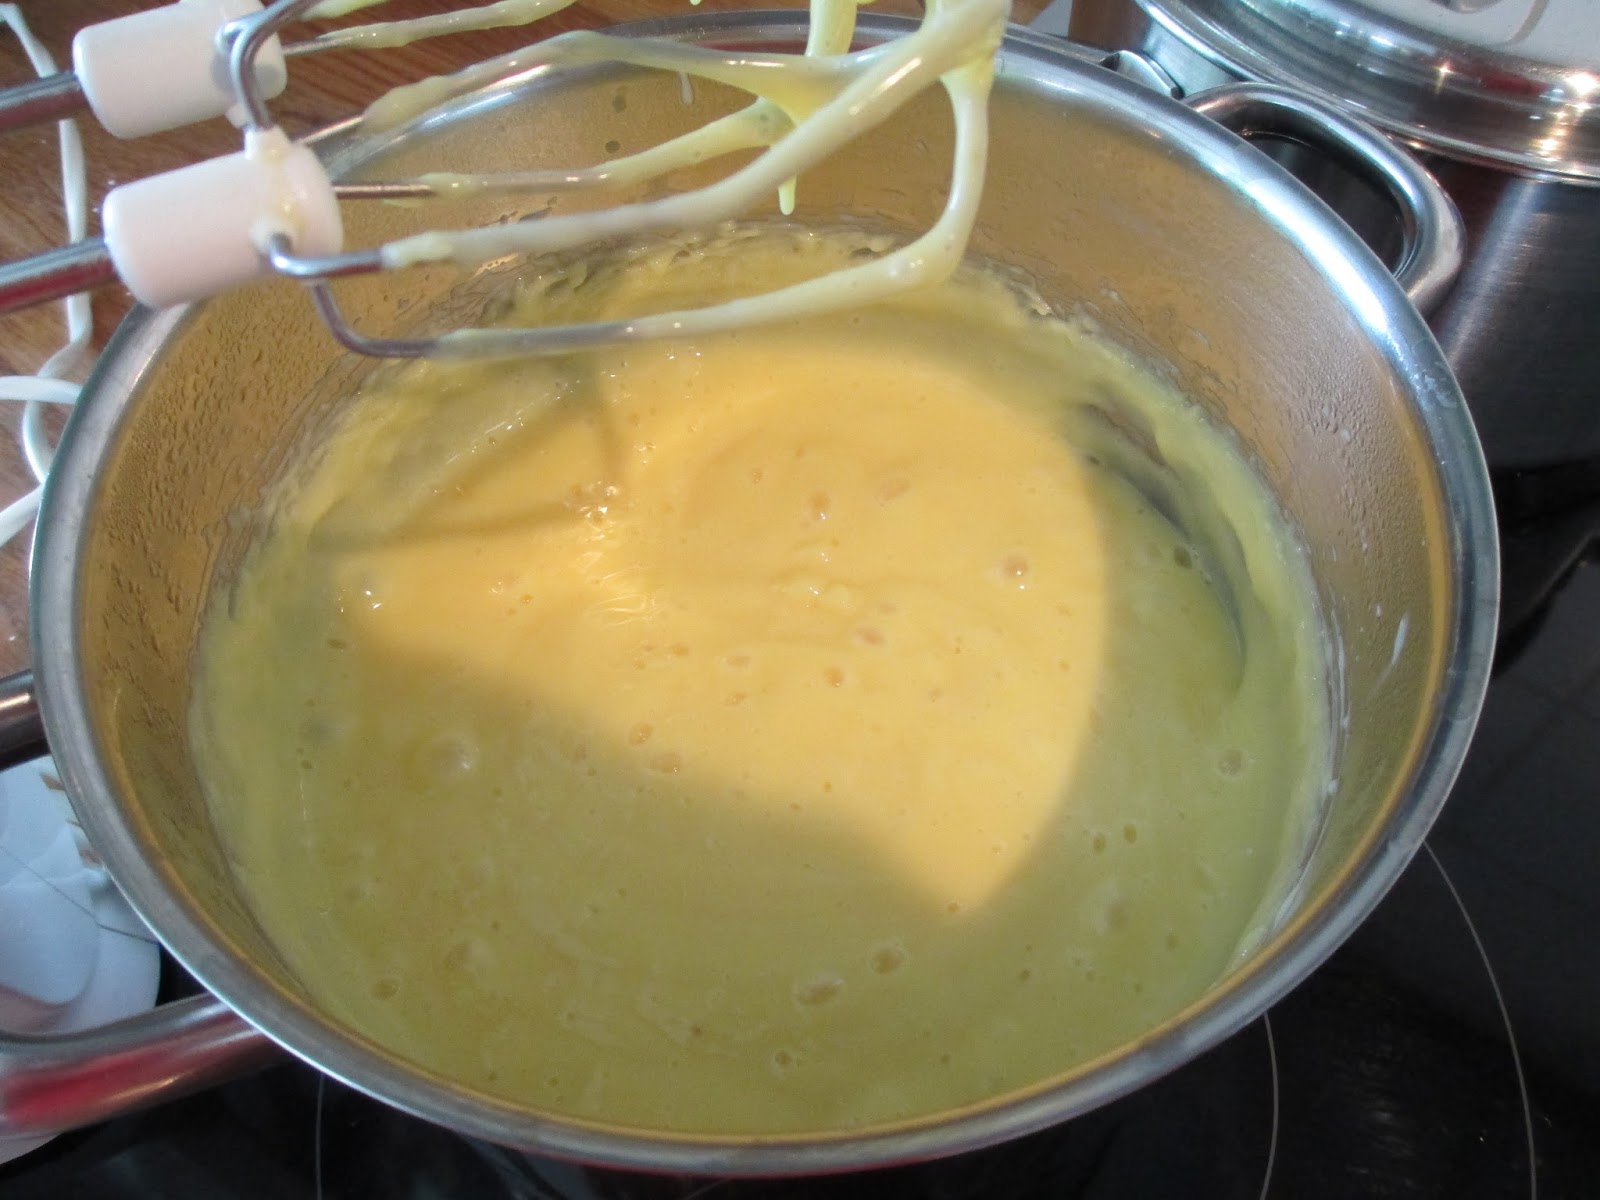
Beat the eggs, the vanilla pudding powder and the sugar with an electric mixer until frothy and slightly whitish-yellow.
Heat the milk until just boiling. Take the pot of milk off the fire. Pour the egg mixture in the milk and mix thoroughly. Then put the pot back on the fire and let cook for a minute so that the cream can cook a little.
Take the pot off the fire and let cool up to room temperature. Regularly stir it to prevent lumps forming or a skin on top.


When the crust had time to cool off, take it out of the pan and you're ready to decorate:


Spread the cream in the crust. Slice the strawberries and cover the cream with the berries all over.

Heat the strawberry jam slightly until it's pourable and brush the tart all over the top with the jam to obtain a shiny layer on top.


Smakelijk!

zaterdag 30 mei 2015

Sweet and tart slices

I am a follower of a great many food blogs. One of them I visit on a regular basis is The English Kitchen because I like the food on it. Nothing very fancy, just good food that's not a pain to make or costs a lot because of exclusive or hard to find ingredients. 


On The English Kitchen I saw a very good looking recipe for strawberry and rhubarb slices and I had to make them. They are made up of two layers: a crust that's not overly sweet with a sweet and tart fruit topping. This topping is a nice contrast to the crust because it's pudding like (it sets but doesn't get dry like a cake). 
I loved these slices a lot, and so thought my mum. My sister doesn't like anything with rhubarb because her stomach doesn't tolerate it (a pity) and my dad thought he liked to have something more cake-like so he didn't think much of it. But that didn't matter because there was more for me of course! (I liked them that much I took a slice for lunch yesterday ...)

Below you can find the recipe for 6 good servings or 8 smaller slices:

Ingredients for the crust:
- 85 grams butter
- 105 grams flour
- 3,5 tablespoons of sugar
Ingredients for topping:
- 1 egg
- 95 grams white sugar
- 50 grams light brown sugar
- 70 grams flour
- 1/2 teaspoon of baking powder
- 1/4 teaspoon salt
- 5 sticks of rhubarb (in 0,5 cm cubes)
- 4 big strawberries (in 0,5 cm cubes)

How to:
Make the topping in advance as it needs to stand in the fridge for at least half an hour.
Mix the eggs and sugars until fluffy with a hand mixer. Add all the other ingredients (except the fruit) one at a time and mix well. Then add the fruit and mix gently until all of the fruit is covered. Just make sure to not crush the strawberries altogether. Put in the fridge. 

After half an hour, preheat the oven to 180°C.
Mix the three ingredients of the crust well until you get a firm dough. Press this dough into a buttered ovenproof dish (I used a 15 x 20 cm glass oven dish) so that the dough covers the whole surface of the dish. 

Now pour the topping over the dough and make sure you spread the topping evenly.
Put in the hot oven and let bake for about 45 minutes or until the topping is set (doesn't wiggle) and is golden in colour.
Take out of the oven and let cool completely.

Serve immediately or up to several days afterwards (I kept them in the fridge).


Smakelijk!

zondag 17 mei 2015

Goat cheese filled sweet pepper with a green salad

When the temperatures rise I always feel like eating salad kind of things. Lots of vegetables and light on the stomach. When you feel the same, you should try this:


I made this salad with sweet pepper filled with goats' cheese TWO times this week. That's how good it is. You can serve it as is or serve it with whole grain bread or a piece of French loaf. The bread will make it more filling of course. The salad can be very simple: just some rocket and some tomatoes for example but feel free to adjust to your own taste. Beetroots are my favorite and when possible, I add them always to mine. 

This is a perfect salad for spring or summer and any other day of year because it's so easy to make, to tasty it can be served just as fancy or informal as you like. 

Ingredients (for 2):
- 1 sweet pepper, sliced in halve lengthwise
- 4 pieces of green asparagus, cooked and sliced in 4 pieced each
- 2 handfuls of rocket
- 1 medium sized beetroot, cooked and diced
- 6 cherry tomatoes
- 2 rolls of fresh goats' cheese (the soft kind, about 100 grams each)
- chilli flakes
- honey 
- black pepper
- salt

How to:
Take the cheese and put each in the cavity of one half pepper. Press well until all fits.


Sprinkle some chilli flakes on the cheese and put honey all over the top. 


Put under the grill/broiler in the oven for about ten minutes or until the pepper softens and the cheese is golden on top. 
Meanwhile, spread the rocket on a plate. Scatter the other veggies on top. Sprinkle some salt and pepper on them all to taste. 


this is a plate for one ... mmmmm!

Put the grilled pepper and cheese on top and serve with some fresh bread if you like.

Smakelijk!

woensdag 13 mei 2015

Sandwiches for lunch

Busy times call for easy meals. On top of that, the weather is great so I'm craving salads and vegetables all the time. 

For lunch today, I made some very tasty and super easy sandwiches.

I took some white bread slices, cut them in half and put two halves at the time in the toaster. 
After they were just golden brown and crispy, I put some Passendale* cheese on top and finished the sandwich by adding slices of cooked beetroot and a little rocket. After putting the other half of the slice on top, I could indulge.


Nothing fancy, just soooo good. 


*Passendale cheese is a Belgian cheese variety that is kind of sweet in taste and it looks pretty as well with all the little holes everywhere. This is how it looks like:


This is a great combination in Summer I think. Nothing heavy on the stomach and healthy. It would've been much more healthy on a wholewheat bread slice but I didn't have the right kind available at home. 

Smakelijk!


maandag 20 april 2015

Trifles to share

If you ever wonder what to do with some cake that's left over, some cream in your fridge that needs to be used up or any type of fruit that's begging to be eaten soon, some booze in the cupboard, look no further: it's time for trifles!


Trifles are super simple and what I'm showing you isn't really a recipe. If you have above mentioned ingredients, you don't need to rush out to get something else (necessarily - unless you want to make them without having left overs or want to fancy things up with extras of course). 

Let me tell you the story of the heavy cream in the fridge:
At home we made waffles a couple of weeks ago for a bunch of family members that came over. In our waffle craze, we thought it was wise to buy more of every ingredient, just in case anyone went hungry (this is a typical Belgian trait, we always tend to buy a lot and serve a lot, even though we have already planned to eat something else the next day and won't be doing anything with the left overs ...). We didn't buy one liter of heavy cream but TWO. Two liters is a lot, I can tell you. Even after eating a pile of waffles each, the 10 of us, there was one and a half liters of cream left. Luckily we only whipped up one liter that time so we only needed to worry about working half a liter up as soon as possible. The other box would keep longer in the fridge. We made chocolate mousse with the left over half liter and that was that.


This week, we checked the box of heavy cream that had been in our fridge for weeks and we saw it was to be eaten this week unless we wanted to throw it away. 
What to do? What to do? We thought about inviting some extra people and eat waffles and my dad was all crazy about that idea as he LOVES waffles but we decided against it. Waffles for dinner two times in a month is really too much. 
Plan B was to prepare a number of things to use the cream up: we could use some for pasta alfredo and have a layer cake with whipped cream (these two things are going to be served to us and a bunch of family members who are again helping us out ^^)

For the cream that would be left (because pasta and cake on one night made with that much cream is a major attack on about everything healthwise), we would bake a batch of waffles for dessert for dad (waffles, strawberries and whipped cream, he'll be in heaven). And as 
I also had one piece of cake left over, it was decided I could make trifles. 

How to do this? Well that's very easy and a lot of fun with some children as well!

Take a piece of cake (regular, vanilla, yogurt or even chocolate), some fruit (berries are wonderful but it's all your choice), whipped and sugared heavy cream (40% fat is what I use). Those are the main ingredients but the trifle can be fancied up with a type of alcohol like Amaretto/marsala or decorated with almond slivers, grated coconut, chocolate sprinkles, ... The possibilities are endless: If you don't have cake, take biscuits and crumble them. If you don't have whipped cream on hands, use some vanilla custard.
The amount of each is not very important, if you prefer or have less of the cake it will be less heavy and more fruit makes it healthier.


Cut the cake in small cubes and sprinkle some drops of the alcohol on it if you like. I used some marsala for the almond flavour it gives. For my two glasses of trifle, I used 1 large piece of cake.


Take some fruit and cut it in smaller pieces. Fruit like raspberries don't need to be cut up, they're the right size. I cut the strawberries however, to have pieces the size of raspberries. When the fruit has the same size, it'll be a more even trifle in the end. I used couple of strawberries and raspberries. I didn't have them so I specially went to the shop for them, just because I wanted to eat berries in the trifle and not any other fruit (but that's me). 


Whip up the heavy cream with some icing sugar to taste. 

Then it's time to make the layers: Take a tall glass or any glass of any size you like. I took some larger round glasses and this makes these trifles BIG. Good to share or for big appetites :)  Smaller glasses are good when you need some portion control or when you serve it after heavy main courses.
With a little help from some spoons, layer the ingredients. I started with some cream, then some fruit and then cake cubes. You keep on layering until you've filled the glass. Anything left over can be eaten by the cook, the dog or anyone who's eyeing you hungrily. 

I wanted to decorate a bit with almond slivers but I couldn't find them. They must have been used up. But as they are just extra, no worries.

Put the glasses in the fridge until you serve them. 

Smakelijk!  

zaterdag 18 april 2015

Grape and yogurt cake

Weekend equals baking. Actually, any day I have time on my hands is a baking day. To my parents and sister and about every person who knows me a bit, it's not a surprise I baked a cake again. It's a good thing they've got good appetites!

I got some inspiration through the blog Laws of the kitchen. There I found a post about a grape harvest cake that looked really good. That cake was based on this recipe of grape harvest cake. I hadn't ever thought of using grapes in a cake or any other baked goods. I thought of grapes as fresh fruit and maybe a nice addition to hearty dishes like stews. This was a totally new thing for me. 


I took the recipe and by making some changes to the recipe I turned it into this cake. 
Below you'll find how I made it. 

Ingredients
- 200 grams vanilla scented sugar
- 100 grams light brown sugar
- 50 grams instant vanilla custard powder (I use Oetker)
- 260 grams plain flour
- 1 packet of baking powder (about 20 grams)
- 7 tablespoons of butter
- 236 ml milk

- zest from 1 orange
- 1 teaspoon salt
- grapes (I used about 20 pieces)
- 150 grams Greek yogurt

- 4 eggs
How to:
Preheat the oven to 160°C.
Mix the flour, the baking powder, the salt and the vanilla custard powder together.
Warm the milk and the butter with the orange zest until the butter is melted.

Crack the eggs in the bowl with the sugar and whisk with an electric mixer until the egg mixture is very frothy and light coloured. 


Mix the yogurt in the egg mixture. Whisk.
Mix half of the flour mixture in. Whisk.
Mix half the milk mixture in. Whisk.
Mix the rest of the flour mixture in. Whisk.
Mix the rest of the milk mixture in. Whisk.

Put the grapes in the batter and pour everything in a buttered and floured cake tin (I used a spring form tin of about 26 cm diameter)


Put in the oven and bake for about 50 minutes or until the cake feels firm when touched.
Take the cake out and let cool slightly. 

Take the cake out of the form, carefully because the grapes might stick to the sides and the bottom.


For serving: dust the cake with some icing sugar for a prettier look. 


My mum is my usual taste-tester and she liked it. She said that the grapes resemble raisins or currants but different. The orange zest wasn't that present but it was good, she said.
She happy, me happy!
I took a piece as well and liked it as well. It's a dense cake and I would make it again as it has a hint of citrus, a good vanilla flavour and the grapes make the cake juicy. 

Smakelijk!

Salmon wrap bites

My sister's boyfriend is celebrating his 26th birthday tomorrow and my sister wants to surprise him with a small get-together with all of his friends in the local park. They're going to play some outdoor games like kubb and petanque. She also wanted to have them some snacks to eat in the meanwhile. She made some things for him like mini fritattas. I offered to help her with something and I made for them small snacks:


packed up to go ...

These are basically wheat tortillas filled with a yogurt-cucumber sauce (look for the recipe to the post of Wednesday) and smoked salmon.
It's a very easy way to serve something festive on a party because the colours are so beautiful together and the taste is just perfect.
Many people who make these kind of wraps fill the tortillas with a herbed cream cheese spread instead of the yoghurt sauce. I, however, prefer a yogurt sauce for two reasons. The first reason is that it is much lighter. The salmon on itself is quite heavy and in combination with cream cheese, the snacks fill you up immediately and that's not the purpose of a snack. The snack should be tasty without taking up all the room in your tummy as there is more to follow ;)
The second reason is because the tortillas are quite dry when filled with cream cheese. The yoghurt is more fluid and makes the wraps more juicy. And juicy is the way to go!

It's so easy that it isn't really a recipe at all but I'll show you the making of the wrap bites:

the cast of the characters:
sugar (1 ts), salt (pinch), black pepper (pinch),
cucumber (about 6 cm), smoked salmon (250 grams),
3 wheat tortillas, Greek yoghurt (150 grams)


the mixing of the sauce ingredients


heating the tortillas to make them more pliable


spreading the sauce on top of the tortillas and
putting the smoked salmon on top


rolling the tortillas


(view from another angle)
ready for an hour in the fridge


just after cutting in slices: ready to eat!

We all love these wrap bites and it's great for any party, fancy or informal.

I hope my sister and her company will love these this afternoon :)

Smakelijk!

Tofu-corn shoarma wrap

I made a tofu-corn shoarma recipe on Wednesday and I had some of the tofu left over. With it I made a very tasty wrap:


me eating the wrap

The wrap was filled with the following ingredients:
- grated beetroot
- grated carrot
- grated cabbage
- roasted red bell pepper
- tofu-corn shoarma  (recipe in previous post)
- my home made cucumber-yogurt sauce (recipe in previous post)

It was delicious and very easy and very Summery.

Smakelijk!

woensdag 15 april 2015

Home made fast food: veggie pita-shoarma

Summer is here! We had to wait for it a little longer than last year but finally we reached 25°C and could have our dinner in the garden. This is the start of the best time of year and what's better to do this than have an informal dinner with friends?

Here at home, we are no lovers of take-away. Apart from fried foods which I do not like myself in particular, I love all of the fast food kind of things. We regularly eat pizza, shoarma stuffed pita bread, chips, noodles, hamburgers... but we always make them ourselves.
(Apart from the occasional time we get home late and are too tired to cook and only feel like walking around the block to go get pita-shoarma)


Today we made pita-shoarma. Most of the time, we buy the breads, the meat and the vegetables we like and put everthing on the table for everyone to stuff his or her own pita. Today, however, I decided it was time to make an alternative to the meat version of pita shoarma. Of course we had falafel lots of times and it's delicious but extending the horizon is always good!

Making a veggie alternative of shoarma might be tricky because my dad is a very dedicated meat-lover. He doesn't even try veggie dishes and only eats vegetables when they're covered in white sauce, cheese or lots of butter. Vegetables to him are just for dressing up the plates.

The plan was to still have meat for dad and offer the others - we were the 8 of us, my family and friends - two other options: falafel and tofu-corn shoarma. We could try what would taste good and there was still some meat in case it was a fail. 

I took some inspiration from the Pioneer Woman who posted a recipe for vegetarian lettuce wraps (www.thepioneerwoman.com). She used tofu. I was interested in the idea of using tofu as well. It's very neutral of taste on it's own so it would be good to spice it up for the pitas. I made the recipe my own and posted it below. 

I must say I liked it a lot and I didn't miss the meat at all. I served it with a tzatziki-like sauce I made just before serving as I realised it would need some sauce. Even one of the friends who was at first not at all interested in veggie things and only wanted to stuff his bread with meat, tried it in the end and took some more!
Even though I prepared the tofu before and heated the skillet just before eating, the result wasn't at all dry. It was juicy, spicy, delicious!


I didn't take a picture of a stuffed pita so this is just some 
tofu-corn shoarma with grilled bell pepper

To make it just as I did, just follow the directions below:

Ingredients for the tofu-corn shoarma:
- neutral oil for the skillet
- 200 grams of tofu in small cubes
- 1 small can (140 grams) of sweet corn (drained)
- 1 table spoon of shoarma seasoning of your choice
- a small dash of balsamic vinegar
- a bit of chilli powder to spice it up
Ingredients for the tzatziki sauce:
- 150 grams Greek yoghurt
- 1/2 teaspoon of sugar
- salt and pepper to taste
- 6 cm of cucumber in very small cubes (I cut the piece of cucumber in 6 slices, cut strips from the slices and cut them in small cubes)


How to:
Heat the oil in the skillet and once it's heated, add the cubes of tofu. With a fork, break the cubes into even smaller pieces until it looks like minced meat. After a minute or two, add the drained sweet corn and let it simmer along with the tofu. Once the tofu and the corn are a little browned, add all the seasonings and the balsamic vinegar. 

For the sauce, just mix all the ingredients together and set aside, easy peasy.
Serve with the tzatiziki sauce, cubes of roasted sweet bell pepper, lettuce, grated beetroots and carrots, tomatoes and basically anything you might like on a pita bread. 


This is enough to fill about 4 to 5 small-sized pita breads. 

Smakelijk is all I can say!